Firebase 동적 링크를 이용하면 iOS 에서 동적 링크를 연 사용자를 네이티브 앱 내 링크된 콘텐츠로 곧장 이동시킬 수 있습니다.
혹은 앱이 설치가 안되어 있을경우 → 앱스토어 이동할수 있으며, 기타 웹페이지로 안내 시킬수도 있습니다.
* 실제로 앱스토어 등록 되어있는 앱에 대해 정상적인 실행 결과를 받아 볼수 있습니다.
1. 프로젝트 신규 추가
https://console.firebase.google.com/
로그인 - Google 계정
하나의 계정으로 모든 Google 서비스를 Google 계정으로 로그인
accounts.google.com
프로젝트는 해당 URL 에 접속해 로그인후 첫 페이지에 접속하면 다음과 같은 화면을 볼수 있습니다.
프로젝트를 만들어 줍시다!


2. 신규 앱 추가

Apple 번들 ID는 프로젝트의 패키지명을 입력해줍니다. (프로젝트 Identity 에서 확인 가능)
App Store ID 같은경우 앱스토어 URL 마지막의 ID 숫자값을 적어줍니다.

GoogleService-Info.plist 파일을 다운로드 합니다.
다운로드 한 파일은 Xcode 프로젝트에 추가 합니다.

PodFile에 다음과 같은 라이브러리를 추가해주고
AppDelegate 상에 FirebaseApp 관련 코드를 추가 해줍니다.
pod 'Firebase/Analytics'
pod 'Firebase/Auth'
pod 'Firebase/Firestore'
pod 'Firebase/DynamicLinks'
import UIKit
import Firebase
@main
class AppDelegate: UIResponder, UIApplicationDelegate {
func application(_ application: UIApplication, didFinishLaunchingWithOptions launchOptions: [UIApplication.LaunchOptionsKey: Any]?) -> Bool {
// Override point for customization after application launch.
FirebaseApp.configure()
return true
}
}다음과 같이 하면 기본적인 프로젝트, 앱 구성은 끝입니다.
이제 DynamicLink 에 대해 알아보기전에 셋팅 해야하는구간이 있습니다.
콘솔 프로젝트 설정 -> 일반 탭에서 App Store ID 값과, 팀 ID 값을 입력합니다.


이제 DynamicLink 에 대해 알아봅시다.
3. 링크 추가
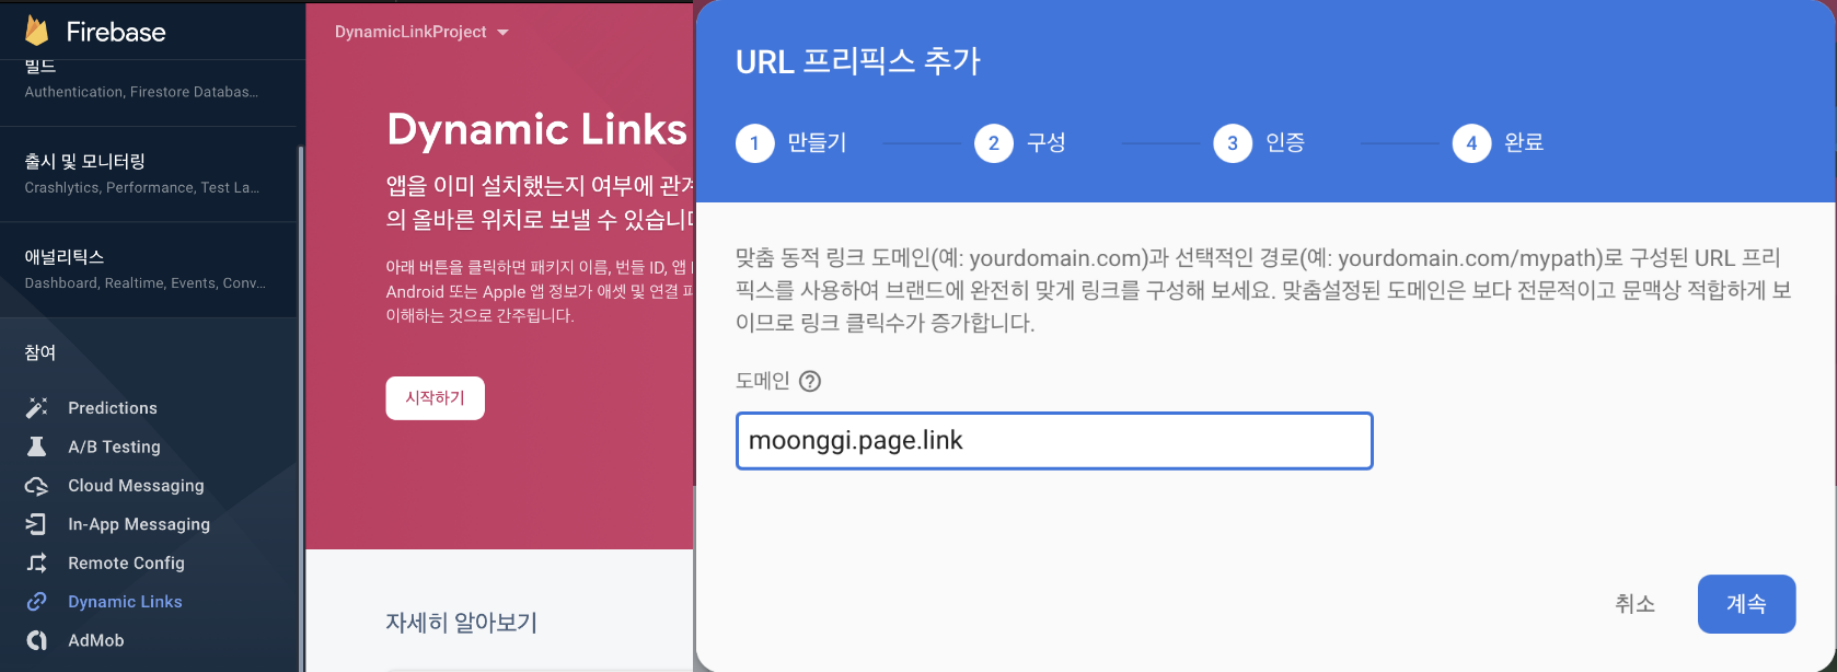
Firebae Console 상의 왼쪽 탭에서 Dynamic Links 를 찾아볼수 있습니다.
시작하기를 눌러 URL 프리픽스를 추가 해줍니다 (딥링크의 URL)

해당 프리픽스 추가후 새 동적 링크 추가를 선택합니다.
딥링크에 대한 상세 정보를 선택 해줍니다 → 링크 클릭에 대한 액션 (앱 실행 or 스토어 연결 등)
한개의 프로젝트에서 Android, iOS 둘다 할경우에는 한개의 URL 에서 만들수 있습니다

다음과같이 링크를 추가 할수도 있지만, 매번 파라미터가 변할수 있는 URL 같은 경우는 동적 링크를 따로 만들어 줍니다.

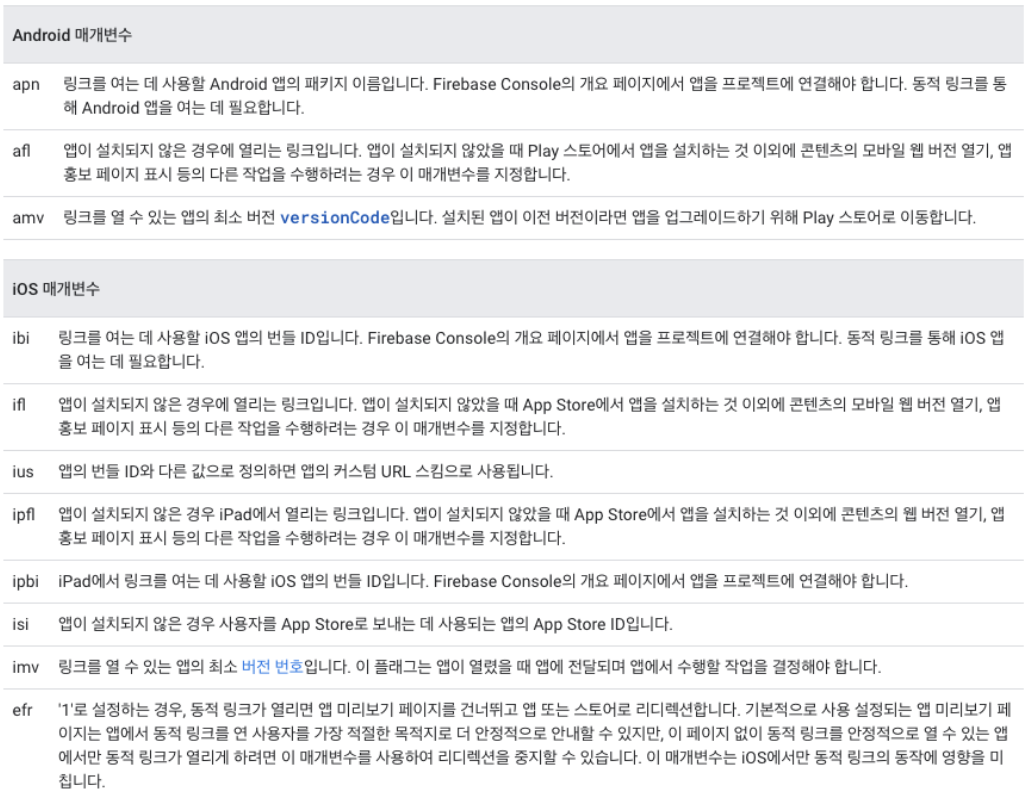
Android, iOS 버전에 대한 매개변수가 따로 있습니다. 같은 프로젝트 일경우 매개변수 같이 이용가능 합니다.

생성 예시 : https://moonggi.page.link/?link=https://moonggi.page.link?value=1&ibi=com.moonggi.DynamicLinkProject&isi=(ID값)
- 딥링크에 대한 정보를 뜻합니다 : 딥링크 뒤에 파라미터(ex : value) 추가하여 붙일수 있음
- 딥링크를 클릭했을때에 앱을 열기위한 앱의 번들 ID 값 입니다 (패키지명)
- 앱이 설치되지 않은 App Store로 연결하기 위한 App Store ID 값 입니다 (App Store Connect 상에서 확인 혹은 앱스토어 상에 검색한후 URL 에 ID 값이 있음)
4. 링크 수신
- 프로젝트 셋팅 상에 Associated Domains 를 추가하여 프리픽스를 추가 합니다
* 만약 Associated Domains 가 없을경우 좌측 상단의 +Capability 를 클릭하여 추가 합니다.

- AppDelegate 상에서도 작업은 가능하나, iOS앱 버전이 상향 되며 몇가지 기능이 SceneDelegate 로 옮겨졌습니다.
- SceneDelegate 상에서 파라미터 수신까지 가능하며, 수신받은 파라미터의 UI 작업은 NotificationCenter 혹은 RxSwift, Combine 를 통해 작업 진행 해야 합니다.
func scene(_ scene: UIScene, willConnectTo session: UISceneSession, options connectionOptions: UIScene.ConnectionOptions) {
        // Use this method to optionally configure and attach the UIWindow `window` to the provided UIWindowScene `scene`.
        // If using a storyboard, the `window` property will automatically be initialized and attached to the scene.
        // This delegate does not imply the connecting scene or session are new (see `application:configurationForConnectingSceneSession` instead).

        // Use a UIHostingController as window root view controller.
        if let windowScene = scene as? UIWindowScene {
            let window = UIWindow(windowScene: windowScene)
            window.rootViewController = UIHostingController(rootView: AppMain())
            self.window = window
            window.makeKeyAndVisible()
        }

        for userActivity in connectionOptions.userActivities {
            if let incomingURL = userActivity.webpageURL{
                let linkHandled = DynamicLinks.dynamicLinks().handleUniversalLink(incomingURL) { (dynamicLink, error) in
                    guard error == nil else{
                        return
                    }
                    if dynamicLink == dynamicLink{
                        self.handelIncomingDynamicLink(_dynamicLink: dynamicLink!)
                    }
                }
                print(linkHandled)
                break
            }
        }


        // Use this method to optionally configure and attach the UIWindow `window` to the provided UIWindowScene `scene`.
        // If using a storyboard, the `window` property will automatically be initialized and attached to the scene.
        // This delegate does not imply the connecting scene or session are new (see `application:configurationForConnectingSceneSession` instead).
        guard let _ = (scene as? UIWindowScene) else { return }
    }


    // 동적 링크를 수신하기 위한 코드
    func handelIncomingDynamicLink(_dynamicLink: DynamicLink) {
         guard let url = _dynamicLink.url else {
            return
        }

        // 파라미터 수신, 및 NotificationCenter 작업
        let queryItems = URLComponents(url: url, resolvingAgainstBaseURL: true)?.queryItems
        let category = queryItems?.filter({$0.name == "value"}).first?.value

		// combine & RxSwift
	 	if let url = category {
            // send & onNext 작업
        }
    }

    func scene(_ scene: UIScene, continue userActivity: NSUserActivity) {
        if let incomingURL = userActivity.webpageURL{
            let linkHandled = DynamicLinks.dynamicLinks().handleUniversalLink(incomingURL) { (dynamicLink, error) in
                guard error == nil else{
                    return
                }
                if dynamicLink == dynamicLink{
                    self.handelIncomingDynamicLink(_dynamicLink: dynamicLink!)
                }
            }
        }
    }

    func scene(_ scene: UIScene, openURLContexts URLContexts: Set<UIOpenURLContext>) {
        if let url = URLContexts.first?.url{
        if let dynamicLink = DynamicLinks.dynamicLinks().dynamicLink(fromCustomSchemeURL: url){
                 self.handelIncomingDynamicLink(_dynamicLink: dynamicLink)
                 //return true
            }
        }
    }
실제 적용한 프로젝트와 포스팅을 위한 프로젝트가 달라 보는데 혼란이 있을수도 있습니다.
하지만 예시를 보면 구현하는데는 어려움은 없을꺼 같습니다.
참고 : https://firebase.google.com/docs/dynamic-links?hl=ko
Firebase 동적 링크 | Firebase Documentation
Firebase 동적 링크는 앱 설치 여부에 관계없이 여러 플랫폼에서 원하는 대로 작동하는 링크입니다.
firebase.google.com
https://firebase.google.com/docs/dynamic-links/create-manually?hl=ko
동적 링크 URL 직접 만들기 | Firebase Documentation
Catch up on everthing we announced at this year's Firebase Summit. Learn more 의견 보내기 동적 링크 URL 직접 만들기 다음 형식으로 URL을 직접 작성하여 동적 링크를 만들 수 있습니다. https://your_subdomain.page.link/?lin
firebase.google.com
https://mrparkcodingschool.tistory.com/19
[Swift] Firebase Dynamic Link 구현 방법(20년 12월 16일자)
목차 개발환경 Xcode는 버전 12.2이고 macOS는 Catalina입니다. Firebase Dynamic Link(동적 링크)란? Firebase Dynamic Link는 해당 링크를 클릭시 해당 앱이 설치되어 있는 경우 앱을 실행하고 설치되어 있지 않..
mrparkcodingschool.tistory.com
https://firebase.google.com/docs/dynamic-links/ios/receive?hl=ko
iOS에서 동적 링크 수신 | Firebase Documentation
Catch up on everthing we announced at this year's Firebase Summit. Learn more 의견 보내기 iOS에서 동적 링크 수신 생성한 Firebase 동적 링크를 수신하려면 앱에 동적 링크 SDK를 포함하고 앱이 로드될 때 handleUniversalL
firebase.google.com
'IOS' 카테고리의 다른 글
| App Store, TestFlight 배포후 앱이 죽는 현상 (0) | 2022.01.02 |
|---|---|
| Xcode 관련 오류를 쌓아보자. (0) | 2021.12.26 |
| SwiftUI - YoutubeKitPlayer (0) | 2021.11.17 |
| Swift - TextView PlaceHolder (0) | 2021.08.26 |
| Swift - Combine VS RxSwift (0) | 2021.08.21 |


